Any frugal DIY’er would agree that if something can be fixed, then it would be a shame to toss it out. This wood planter box repair looked doable, and with a few fasteners, glue, and a new bottom it looks as good as new.
The planter box is about 12″ in length, and is made from a lightweight plywood. The original finish is an evergreen color stain with a sort of weathered look. The original bottom was made from a wafer thin piece of what looked like balsa wood.

Pieces of the planter box

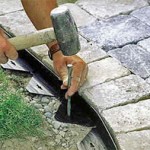
This side of the planter still had the original wafer thin bottom attached to it (see where arrow is pointing)
Overtime, it has weathered from being outside. The glue used to hold it all together failed, and the box literally began to fall apart at the seams.
The Repair
The old bottom was removed, and the mitered edges of the sides were sanded to smooth out uneven spots and to remove the old glue.
For a new more substantial bottom for the planter, a piece of half inch cedar was used. The sides of the planter box are angled, so the edges of the piece of cedar were cut at the same angle. Three drainage holes were created in the cedar bottom with a spade bit.

Sketch shows how the new cedar bottom was cut to accommodate the angle of the sides, and how the sides were attached to it.
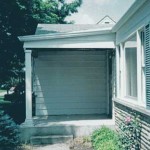
To make the repair sturdier, instead of the sides setting on top of the bottom (as they did originally), they would now be attached to the outer edges of the cedar bottom. Since the sides were at an angle to the bottom, the screws had to be square to the bottom, not the sides, to keep them from surfacing through the top of the cedar bottom. Two stainless steel screws were used to attach each of the four sides to the cedar board. Stainless steel fasteners resist rust and corrosion, so they are perfect for outdoor projects.
All the seams were glued, including the edges that were fastened with the screws. These stainless steel screws have an auger point tip which helps prevent the wood from splitting, and a nib on the outer part of the head to countersink it.

This is the repaired planter box. You can see the stainless steel screws along the bottom edge, and the 3 drainage holes in the new bottom.
If you have a project where you’d like to use a color coated stainless steel screw, you could check out Headcote fasteners.
Two pairs of hands come in handy. One can hold pieces together, while the other person attaches the fasteners. After all the pieces were connected, the planter was secured with clamps until the glue dried.

After the dry time, the top of the mitered corners were secured with four stainless steel wire brads, one at each corner. Pilot holes were made, and glue was placed along each nail shank before nailing. A dowel, cut to size, along with the glue could also be used in place of the brads.

Keeping the Wood Dry
It’s always a good idea to keep wood as dry as possible. Along with the drainage holes in the bottom, a liner inside a wood planter helps to keep the wood from being continuously exposed to moisture.
Frugal Friday