Do you know how to turn a shrub into a small multi-stemmed ‘tree’? Here’s a technique that many homeowners will find useful for certain shrubs that have gotten too big and outgrown their space.

This just so happens to be the case with a Northern Bayberry (Myrica pensylvanica) in my yard. It was probably 3 feet in height when it was first planted near the front porch as an accent plant. The bayberry is a favorite of mine. It has semi-glossy leaves, and it is visually interesting for both shape and texture. It is a beautiful shrub when left to its natural form.
As you can see in Photo A, it is 8 feet in height and is quite large now. It no longer is that smaller attractive accent plant. And added to that, it is blocking outward views through the window behind it.
Since I love this shrub so much, I didn’t want to rip it out and replace it. After all, much time has been invested in its development, and the years of enjoyment it has provided were at stake.
The ‘What to do’ Part
Luckily there are some shrubs, such as varieties of lilac, viburnum, burningbush, and the bayberry, that can be pruned to actually take on the form and appearance of a small multi-stem tree. This is a simple way to change the appearance of a shrub that has outgrown its space, and basically lost its charm!
The process is a simple one, and should be done when the shrub is in full leaf. It takes some patience because you’ll have to back away from the shrub a lot (like an artist looking at a canvas!) to decide where to prune next, and to basically check how the shrub is looking overall. The tools I used were hand pruning shears and a bypass lopper shears.
If you’re not sure about removing a section of a branch, gently move the branch out of the way a bit, to get an idea of how the shrub would look without that branch. Sometimes, it’s best to remove part of the branch in question first instead of removing the entire section all at once. Don’t worry about mistakes, plants grow and cover things up over time.
The Process
• Before starting, make sure the blades of your pruners are sharp.
• To begin, start at the bottom of the shrub and work your way up. Don’t forget to stand back away from the shrub to decide what branches need to be cut.
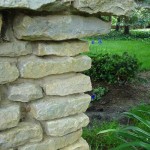
• At the bottom, remove the little twig-like branches, and tiny shoots, with leaves. Also, remove any lower branches that are growing horizontal to the ground. See Photo B.

Photo B: The lower branches will look like graceful tree trunks
• As you work your way upward, remove any dead branches inside the shrub. Also, remove any tiny shoots with leaves. This will open up the shrub and give it a more airy and graceful appearance (like a multi-stemmed ornamental tree).
• At the top of the shrub, remove sections of the top branches to reduce the height if the shrub is too tall for your liking.
• At this point, you can remove selected sections of the top branches to open up the top of the canopy, which will also add to the airy appearance.
Before

After
Now you have a ‘new’ plant and your landscape has a new look. And it didn’t cost you anything, only a bit of your time!